How to Speed Up WooCommerce: The Complete 10-Step Guide
Knowing how to speed up WooCommerce is one thing — knowing where to start, and in what order, is another. Applying the wrong optimisations first wastes time and can break things. This step-by-step guide takes you through the process in the right sequence: measure first, fix the biggest problems, and understand the ceiling you're working toward.
TL;DR
Step 1: Measure first
Don't touch any settings until you have a baseline. You need to know where the problems actually are, not guess. Run your homepage, a product page, a category page, and your checkout through at least two of these tools:
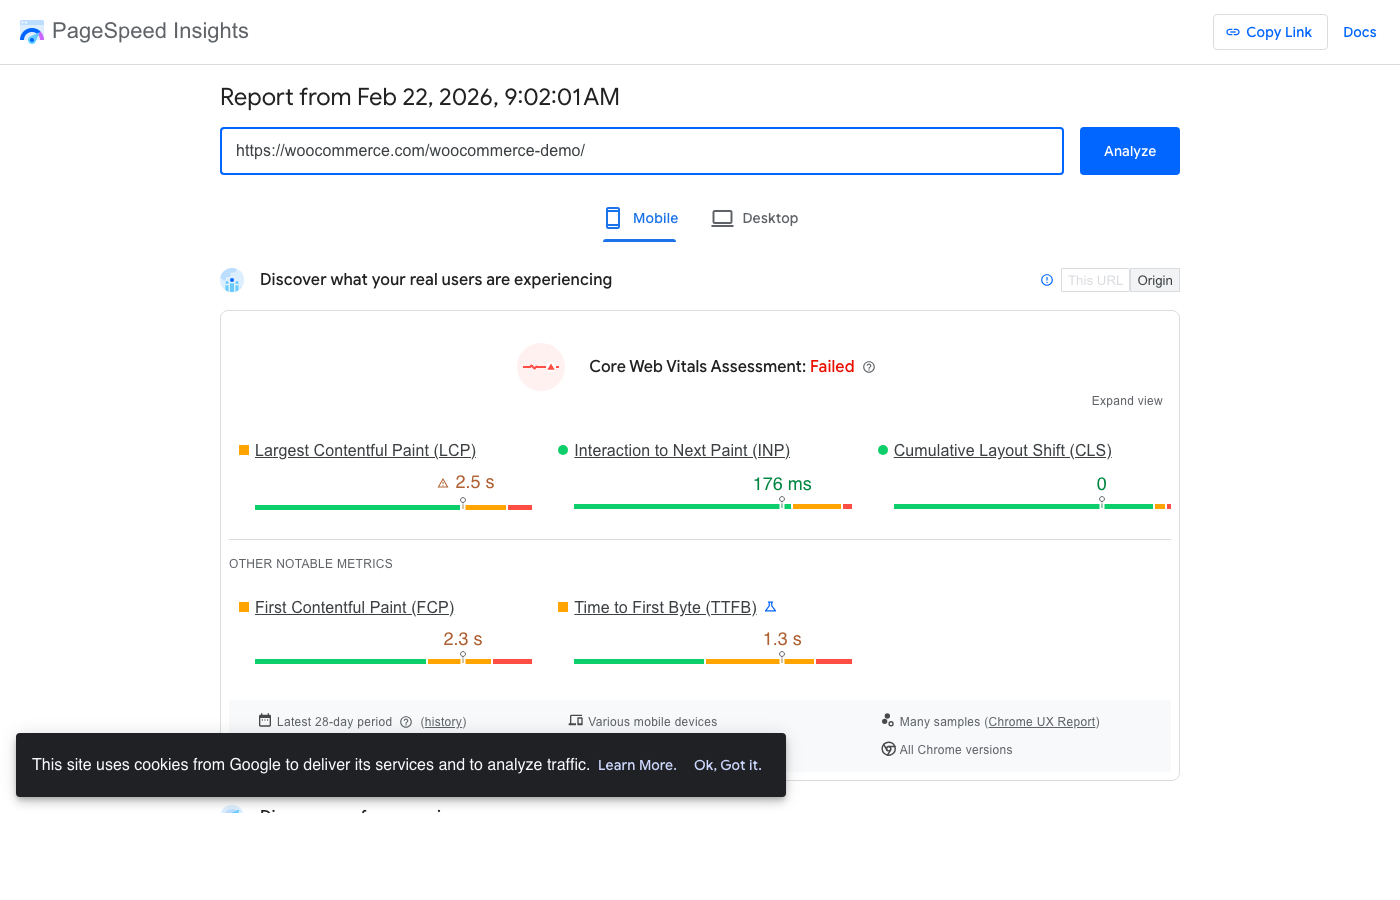
- Google PageSpeed Insights — shows real-world Core Web Vitals data from Chrome users plus lab-based Lighthouse scores. The most important tool because it uses Google's own data.
- GTmetrix — detailed waterfall view showing exactly which requests are slow and why. Set the test region to your primary audience location.
- Query Monitor — a free WordPress plugin that shows how many database queries each page executes and how long they take. Essential for identifying plugin bloat.
- WebPageTest — advanced testing with real browsers, multiple locations, and connection speed simulation.
Save your baseline scores
Step 2: Install and configure a caching plugin
Page caching is the single highest-impact change you can make to a WordPress and WooCommerce site. Without it, PHP generates every page on every request. With it, most pages are served as pre-built HTML files.
For WooCommerce specifically, choose a plugin that handles the dynamic pages correctly. Cart, checkout, and My Account must never be cached. See our full WooCommerce caching plugin comparison for a detailed breakdown. The quick recommendations:
- WP Rocket — easiest setup, WooCommerce-safe by default ($59/year)
- LiteSpeed Cache — best free option (requires LiteSpeed hosting)
- WP Super Cache — reliable free option for any hosting
- NitroPack — all-in-one if you want managed CDN too (from $8/month)

Always test after enabling caching
60–80%
TTFB reduction from page caching on most stores
15–30
Typical Lighthouse score improvement from caching alone
<5 min
Time to configure WP Rocket correctly for WooCommerce
Step 3: Optimise your images
Images are usually the largest contributor to page weight on WooCommerce product and category pages. Unoptimised product photos can easily run to 500KB–2MB each. At 20 products per category page, that's up to 40MB before a single CSS or JavaScript file loads.
There are three things to fix:
- Compress and convert to WebP/AVIF — WebP is typically 30–50% smaller than JPEG at equivalent quality. Use Imagify, ShortPixel, or the image tools in LiteSpeed Cache/NitroPack.
- Set correct dimensions — Uploading a 4000px wide product photo that displays at 400px wastes bandwidth. Resize to display dimensions before uploading, or use WooCommerce's built-in image regeneration.
- Lazy load below-the-fold images — Most caching plugins include lazy loading. Ensure the hero/first product image is NOT lazy loaded (it's your LCP element and delays rendering if deferred).
“Converting product images to WebP alone dropped our page weight by 40%.”
Step 4: Audit and reduce plugin bloat
Every active WordPress plugin adds to your page load time. Some add database queries, some load JavaScript on every page, some add PHP processing that runs even on pages where the plugin does nothing. With 20–30 plugins (typical for a WooCommerce store), this compounds quickly.
Use Query Monitor to see how many database queries are running per page. A product page running 60+ queries is a red flag. Then use the Perfmatters Script Manager or Asset CleanUp Pro to disable plugin scripts on pages where they aren't needed.
The worst offenders
Pros
- Script Manager lets you disable JS/CSS per page — often the quickest win after caching
- Removing unused plugins reduces attack surface and DB queries simultaneously
- Identifying plugin bloat is free with Query Monitor
Cons
- Disabling plugin scripts incorrectly will break functionality
- Every plugin removal requires testing — there are no safe assumptions
- Some plugins with bad performance are also business-critical (review software, loyalty, subscriptions)
Step 5: Disable WooCommerce cart fragments on empty carts
WooCommerce makes an AJAX request (wc-ajax=get_refreshed_fragments) on every page load to update the cart widget in real time. Even when the visitor has an empty cart. Even on your homepage. This request fires before the page becomes interactive and adds latency to every page load for every visitor.
Perfmatters has a one-click option to disable this request when the cart is empty. WP Rocket also optimises cart fragment requests. This is one of the most effective per-change performance wins available for WooCommerce without any visible user impact.

Step 6: Enable a CDN
A Content Delivery Network caches your static assets (images, CSS, JavaScript) at edge servers around the world. Visitors get those files from a server near them rather than from your origin server, which reduces latency regardless of where your hosting is located.
For WooCommerce, a CDN is particularly valuable for product images. Cloudflare has a generous free tier that works well for most stores. BunnyCDN and KeyCDN are cost-effective paid options. NitroPack includes CDN in its subscription. WP Rocket integrates with RocketCDN and major CDN providers.
Cloudflare is a good starting point
Step 7: Enable object caching (Redis or Memcached)
Object caching stores the results of expensive PHP operations and database queries in memory so they don't have to be recalculated on every request. For WooCommerce stores with large catalogues, object caching can significantly reduce page generation time for logged-in users and pages that bypass full page caching.
This requires your hosting provider to support Redis or Memcached. Many managed WordPress hosts (WP Engine, Kinsta, Cloudways) enable this by default or as an add-on. The W3 Total Cache, LiteSpeed Cache, and WP Rocket (with add-on) all support object caching backends.
Object caching is essential for large catalogues
Step 8: Optimise your WooCommerce database
WooCommerce stores accumulate database bloat over time — transient options, expired sessions, post revisions, spam comments, and orphaned metadata. A store running for a year can easily have a wp_options table with 5,000+ autoloaded rows and a wp_postmeta table with millions of entries.
Practical database optimisations that make a measurable difference:
- Clean up autoloaded options — Use the Advanced Database Cleaner plugin or WP-CLI to identify and remove bloated autoloaded data. Reducing autoloaded data from 2MB to 200KB can cut TTFB by 200-400ms.
- Limit post revisions — Add
define('WP_POST_REVISIONS', 5)to wp-config.php. Each revision creates multiple wp_postmeta rows for WooCommerce products. - Enable HPOS — WooCommerce's High Performance Order Storage moves orders to dedicated tables, making order queries 5-10x faster. See our HPOS migration guide.
- Clean up expired transients — Run
wp transient delete --expired --allvia WP-CLI monthly.
Step 9: Review your hosting environment
After applying the above steps, your remaining bottleneck is often the server itself. Shared hosting with slow PHP execution times limits how much caching can help — caches expire, dynamic pages still need PHP, and the server ceiling is low.
For WooCommerce stores with meaningful traffic, consider:
- Managed WordPress hosting — Kinsta, WP Engine, and Cloudways all offer PHP environments tuned for WordPress/WooCommerce
- LiteSpeed-based hosting — enables server-level caching with LiteSpeed Cache plugin (biggest free performance gain available)
- VPS with proper configuration — more control, but requires server management expertise
What to tackle first
1st
Caching plugin — highest impact change
2nd
Image optimisation — usually highest page weight
3rd
Plugin audit + CDN — compound the gains
Most WooCommerce stores can reach a Lighthouse score of 70–85 with the steps above. That is a genuinely good result and enough for the majority of stores. But if your checkout is still slow, or your Core Web Vitals are failing on dynamic pages, the remaining bottleneck is architectural.
Step 10: Know the architectural ceiling
Everything above optimises WooCommerce within its existing architecture. But that architecture has a hard ceiling: PHP generates HTML on every request for dynamic pages (cart, checkout, my account). No caching plugin can fix this because these pages must show personalised, real-time data.
Our WooCommerce speed optimisation guide covers the architectural root cause in detail. The slow checkout guide explains why checkout specifically hits this wall.
The step that removes the ceiling entirely is a headless WooCommerce frontend. Instead of PHP generating pages, a Next.js application serves pre-rendered and edge-cached pages with sub-100ms TTFB. Even cart and checkout become fast because the frontend fetches data asynchronously rather than waiting for PHP to build the entire page.
When optimisation is not enough
Keep reading
Related guides you might find useful
Why Is WooCommerce So Slow? The Architecture Problem (and the Fix)
Caching and hosting only go so far. Here's why WooCommerce is inherently slow, what the usual fixes miss, and how a headless frontend solves the root cause.
Read guidePerformanceWooCommerce Slow Checkout: Why It Happens and How to Fix It
WooCommerce checkout cannot be cached — it runs PHP on every request. Here's why it's slow, what actually helps, and where the hard architectural limit is.
Read guidePerformanceThe WooCommerce Plugin Bloat Problem (And How Headless Solves It)
The average WooCommerce store runs 30-50 plugins, adding 200-800ms of PHP execution and up to 2MB of assets per page. Here is how to measure, reduce, and ultimately eliminate plugin bloat.
Read guideYour plugins are the bottleneck.
WPBundle replaces 13 WooCommerce plugins with one optimized suite. Faster load times, fewer conflicts, $149 once.
Join the Waitlist